
※ 실습 프로젝트는 Github에서 확인 할 수 있습니다.
Swagger란?
API에 대한 정보를 전달하기 위해 일일이 문서화하는 것은 매우 번거로운 작업이다. 매번 Rest API를 개발하고 수정하면서 API문서를 변경하는 것은 개발자의 생산성 또한 떨어뜨린다.
Swagger는 이러한 API문서를 자동으로 생성하여 HTML로 만들어주는 오픈 소스 프레임워크이다.
OAS란?
Open API Specification의 약자로 RESTful API 를 기술하는 표준이다. 서비스에서 제공하는 API의 기능과 End Point를 개발자나 시스템이 자동으로 발견하고 처리하는데 필요한 정보를 제공한다.
즉, Swagger는 OAS에 맞춰 디자인하고 문서화하고 빌드하기 위한 도구들의 모음이다. 이는 RESTful API 의 설계 및 문서화에 매우 도움을 준다.
Swagger 적용
1) build.gralde에 관련 의존성 추가

1
implementation group: 'org.springdoc', name: 'springdoc-openapi-ui', version: '1.5.9'
springdoc-openapi-ui에는 swagger.core.v3가 포함되어 있다. 따라서 springdoc-openapi-ui 라이브러리를 추가한 후 HTML 형식의 API 테스트 페이지인 Swagger-ui 페이지를 이용할 수 있다.
2) application.yml 파일에 프로퍼티 설정

1
2
3
4
5
6
7
8
9
10
11
12
13
14
springdoc:
  version: '@project.version@'
  api-docs:
    path: /api-docs
  default-consumes-media-type: application/json
  default-produces-media-type: application/json
  swagger-ui:
    operations-sorter: alpha
    tags-sorter: alpha
    path: /swagger-ui.html
    disable-swagger-default-url: true
    display-query-params-without-oauth2: true
  paths-to-match:
    - /api/v1/**
- spring doc
- api-docs.path
- 기본값: /v3/api-docs
- spring boot 웹 애플리케이션의 api를 OpenAPI 3을 이용하여 json 형식화 한 것의 경로
- default-consumes-media-type
- 기본값:
application/json - request media type 의 기본값
- 기본값:
- default-produces-media-type
- 기본값:
*/* - response media type 의 기본값
- 기본값:
- swagger-ui.operations-sorter
- 기본값: 컨트롤러 내에서 정의한 api 메서드 순
- 태그 내 각 api의 정렬 기준
- alpha(알파벳 오름차순), method(Http 메소드 순)
- swagger-ui.tags-sorter
- 태그 정렬 기준
- swagger-ui.path
- 기본값:
swagger-ui.html - Swagger HTML 문서 경로
- swagger 2.0과 달리 swaager 3.0은 기본 swagger-ui 접속 Url이 http://localhost:8080/swagger-ui.html이 아닌 http://localhost:8080/swagger-ui/로 바뀌었음
- 기본값:
- swagger-ui.disable-swagger-default-url
- swagger-ui default url인 petstore html 문서 비활성화 여부
v1.4.1 이상 버전부터 지원함
- swagger-ui.display-query-params-without-oauth2
- 기본값: false
- json화 된 config 파일 대신 파라미터를 이용하여 swagger-ui에 접근하도록 함
- api-docs(
/api-docs) 및 swagger-ui.configUrl(/api-docs/swagger-config)를 두 번씩 호출하는 것을 방지함 v1.4.1 이상 버전부터 지원함
- paths-to-match
- OpenAPI 3 로 문서화할 api path 리스트
- api-docs.path
Note: 더 자세한 설정정보를 알고 싶다면 springdoc-openapi를 참고
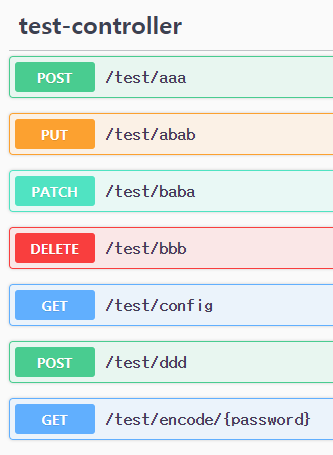
2-1) operations-sorter 설정에 따른 api 출력화면
 출처: https://blog.jiniworld.me/83#a01-1 [hello jiniworld]
- springdoc.swagger-ui.operations-sorter : alpha
 출처: https://blog.jiniworld.me/83#a01-1 [hello jiniworld]
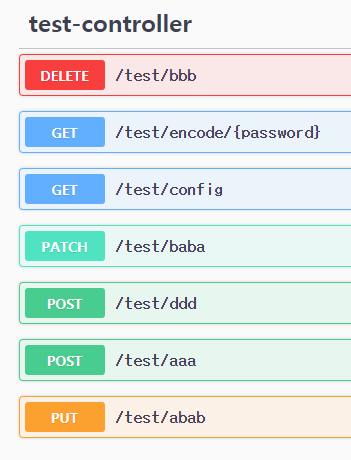
- springdoc.swagger-ui.operations-sorter : method
- DELETE → GET → PATCH → POST → PUT 순서
2-2 ) display-query-params-without-oauth2 설정에 따른 리소스 호출 횟수
 출처: https://blog.jiniworld.me/83#a01-1 [hello jiniworld]
- swagger-ui.display-query-params-without-oauth2 : false
- /api-docs와 /api-docs/swagger-config를 2번씩 호출한다.
 출처: https://blog.jiniworld.me/83#a01-1 [hello jiniworld]
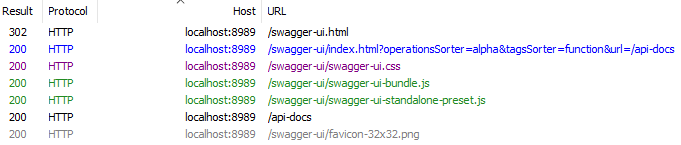
- swagger-ui.display-query-params-without-oauth2 : true
- /api-docs/swagger-config 를 호출하지 않으며, 파라미터를 이용하여 swagger-ui html문서를 호출한다.
Note: display-query-params-without-oauth2 설정 관련해서는 추가적으로 학습 후 업데이트 예정
3) security 설정

1
2
3
4
5
6
7
8
9
10
11
12
13
14
15
16
17
18
19
20
@Override
protected void configure(HttpSecurity http) throws Exception {
    http
            .csrf().disable()
            .headers().frameOptions().disable()
            .and()
                .authorizeRequests()
                    .antMatchers("/index").hasRole("USER")
                    .antMatchers("/swagger-ui.html", "/swagger-ui/**", "/api-docs", "/api-docs/**").hasRole("USER")
                    .anyRequest().permitAll()
            .and()
                .formLogin()
                    .loginPage("/user/loginForm")
                    .successForwardUrl("/index")
                    // .loginProcessingUrl("/user/login")
                    .failureForwardUrl("/index").permitAll()
            .and()
                .addFilterBefore(customAuthenticationFilter(), UsernamePasswordAuthenticationFilter.class);

}
swagger 페이지 접속에 관한 권한을 설정한다. 테스트를 위한 목적이기에 USER 권한을 가진 사용자만 접근할 수 있도록 .hasRole('USER') 설정을 하였다.
3) Config 클래스 추가
OpenAPI 의 Info 설정을 별도하지 않을 경우 아래와 같은 모양으로 Swagger-ui 페이지가 자동 설정된다.

Swagger-ui 기본 화면
OpenAPI bean 을 이용하여 Swagger-ui를 구성하는 Bean을 등록해보자.
1
2
3
4
5
6
7
8
9
10
11
12
13
14
15
16
17
18
19
20
21
22
23
24
25
26
27
28
29
30
31
32
33
import io.swagger.v3.oas.models.Components;
import io.swagger.v3.oas.models.OpenAPI;
import io.swagger.v3.oas.models.info.Contact;
import io.swagger.v3.oas.models.info.Info;
import io.swagger.v3.oas.models.info.License;
import org.springframework.beans.factory.annotation.Value;
import org.springframework.context.annotation.Bean;
import org.springframework.context.annotation.Configuration;

@Configuration
public class OpenAPIConfig {

    @Bean
    public OpenAPI openAPI(@Value("${springdoc.version}") String appVersion) {
        Info info = new Info()
                .title("Demo API")
                .version(appVersion)
                .description("Spring Boot를 이용한 Demo 웹 애플리케이션 API입니다.")
                .termsOfService("http://swagger.io/terms/")
                .contact(new Contact()
                        .name("youngho")
                        .url("https://jeonyoungho.github.io")
                        .email("yhjun1000@gmail.com"))
                .license(new License()
                        .name("Apache License Version 2.0")
                        .url("http://www.apache.org/licenses/LICENSE-2.0")
                );

        return new OpenAPI()
                .components(new Components())
                .info(info);
    }
}

OpenAPI 빈을 설정한 후의 Swagger-ui 화면
4) Controller 관련 상세 설정
‘Open API 3.0 Swagger v3 상세설정’ 포스팅 참고
5) swagger-ui 실행
springdoc.swagger-ui.path에 정의한 경로(default: swagger-ui.html)로 접속할 Swagger 관련 설정값을 이용하여 Swagger-ui HTML페이지로 Redirect된다.
궁극적인 Swagger-ui 도착지 주소는 /swagger-ui/index.html 이지만, 이페이지는 API명세를 만들기 위해 api-docs에 대한 파라미터를 필수적으로 입력받아야 생성된다. 만일, 파라미터를 설정하지 않을 경우에는 아래와 같은 petstore 페이지가 출력된다.

파라미터 미설정시 표현할 defaultUrl 설정을 끄고 싶다면 springdoc.swagger-ui.disable-swagger-default-url 속성을 true로 설정하면 된다.
1
disable-swagger-default-url: true
query-param을 url로 표출할 것인지에 대한 설정에 따라 url에서 이용되는 필수 파라미터가 달라진다. 이는 springdoc.swagger-ui.display-query-params-without-oauth2 에서 설정 할 수 있다.
이 값이 true일 경우에는 Swagger-ui를 구성하는데 필요한 설정값들을 파라미터로 표출하고 false일 경우에는 configUrl만 받는다.
- false
/swagger-ui/index.html?configUrl=/api-docs/swagger-config
- true
/swagger-ui/index.html?operationsSorter=method&tagsSorter=alpha&url=/api-docs
open-api 프로퍼티와 관련해서 더 자세한 정보를 보려면 여기를 참조하자.
6) 실행
GET api (findById)를 실행한 결과 화면입니다. 200 status와 ResponseBody가 정상적으로 출력됨을 확인할 수 있다.


이번에는 PUT api를 실해보았다. 하지만 csrf토큰을 안보내줬기에 403 Forbidden Error가 나왔다.


Spring Security는 웹 보안 취약점 해결을 위해 csrf token을 사용하는데 csrf-token이 설정되어있지 않아 발생되는 문제이다.
csrf token을 활성화 시킨 후, postman에서도 이전에 잘 동작하던 PATCH/POST/PUT/DELETE method api가 403 Forbidden 에러를 반환했었고, 이에 대한 해결책으로 header에 X-XSRF-TOKEN를 설정했었다.
※ 출처 블로그의 Spring Security 관련 postman에서 csrf token 이용하기를 참고하자.
이번에는 postman과 다른 방식으로 이 오류 현상을 해결해보자. 바로, Swagger로부터 요청된 api일 경우 csrf token을 요구하지 않도록 설정하는 것이다.
7) Swagger-ui에서 csrf token 비활성화
1
2
3
4
5
6
7
8
9
10
11
12
13
14
15
16
17
18
19
20
21
22
23
24
25
26
27
28
29
30
31
32
33
34
35
36
37
38
39
40
41
42
43
44
45
46
47
48
49
@RequiredArgsConstructor
@EnableWebSecurity
public class SecurityConfig extends WebSecurityConfigurerAdapter {

    private final UserDetailsService userDetailsService;

    ...

    @Override
    protected void configure(HttpSecurity http) throws Exception {
        http
                .headers().frameOptions().disable()
                .and()
                    .authorizeRequests()
                        .antMatchers("/index").hasRole("USER")
                        .antMatchers("/swagger-ui.html", "/swagger-ui/**", "/api-docs", "/api-docs/**").hasRole("USER")
                        .anyRequest().permitAll()
                .and()
                    .formLogin()
                        .loginPage("/user/loginForm")
                        .successForwardUrl("/index")
                        // .loginProcessingUrl("/user/login")
                        .failureForwardUrl("/index").permitAll()
                .and()
                    .addFilterBefore(customAuthenticationFilter(), UsernamePasswordAuthenticationFilter.class)
                .csrf()
                    .requireCsrfProtectionMatcher(new CsrfRequireMatcher())
                    .csrfTokenRepository(CookieCsrfTokenRepository.withHttpOnlyFalse());

    }

    static class CsrfRequireMatcher implements RequestMatcher {
        private static final Pattern ALLOWED_METHODS = Pattern.compile("^(GET|HEAD|TRACE|OPTIONS)$");

        @Override
        public boolean matches(HttpServletRequest request) {
            if (ALLOWED_METHODS.matcher(request.getMethod()).matches())
                return false;

            final String referer = request.getHeader("Referer");
            if (referer != null && referer.contains("/swagger-ui")) {
                return false;
            }
            return true;
        }
    }

    ...
}
configure메소드의 requireCsrfProtectionMatcher메소드의 인자로 CsrfRequireMatcher클래스를 생성하며 csrf 토큰을 요구하는 패턴에 대해 설정하였다.
또한 CsrfRequireMatcher static클래스의 matches 메소드를 오버라이드 함으로써 단순 조회 기능을 제공하는 GET, HEAD, TRACE, OPTIONS method의 경우 CORS 처리를 하지않도록 하였으며, request를 보낸 페이지 url에 /swagger-ui url이 포함되어있다면 CORS 처리 하지 않도록 하였다.
requireCsrfProtectionMatcher 설정을 마친 후 다시 PUT api를 실행해보자.


정상적으로 api 실행이 되었음을 확인할 수 있다.